Worldwide shipping
Shipping & Returns
Quality assured
Find retail locations
Expert support
For All Your Questions
Fast and secure
For All Your Questions
Shipping & Returns
Find retail locations
For All Your Questions
For All Your Questions
In case we have not met, I’m Alexa Williams, Ask Alexa. I have worked here at Etelux for almost 15 years establishing great relationships with our customers and partners. Throughout my career at Etelux, I have had the pleasure of advocating for you, the customer, to make sure that you are taken care of. Most of the time, I am the friendly voice that answers the corporate phone line, so if we have not met in person, I’m sure we have talked. This form is to reach me directly, and I will respond as soon as I can. You can ask me anything, such as questions about our enclosures, help with which replacement parts to order, certification questions, etc…
Serving the Chinese scientific industry for over 15 years, discover how quality products, competitive pricing, and next day delivery allow us to achieve our mission “Enabling Technology for a Better World ".
Ultricies eu consectetur vitae donec scelerisque ante a ut morbi aptent tincidunt est non sagittis ut.


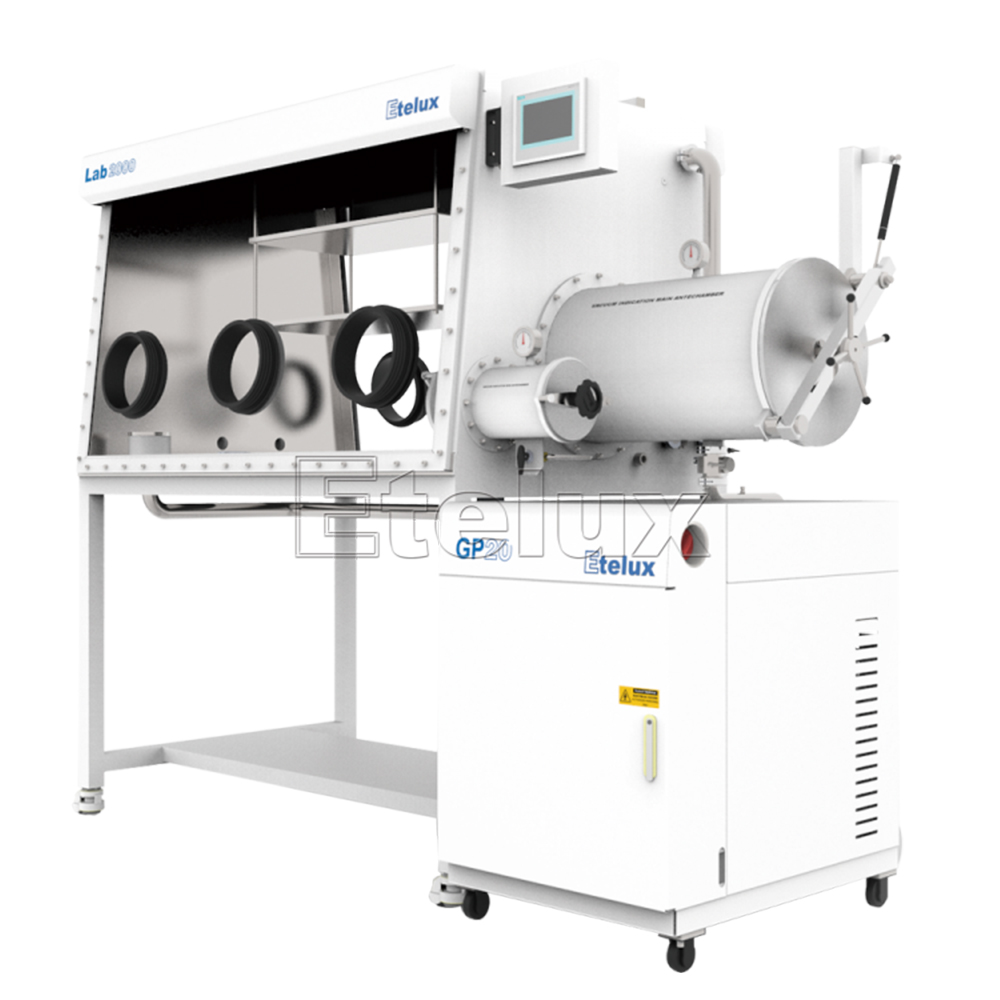
1, Start
1) Open the main power switch (red);
2) Open the working gas pressure reducing valve (the main valve is opened to the maximum, the coupling is opened to 0.4 ~ 0.6 MPa);
3) Start the analyzer (the oxygen indicator will start when the water indicator is dropped to 200 ppm or less;
4) Start loop (determine that the oxygen value is less than 200 ppm to open the loop, otherwise it is cleaned to 200 ppm and then loop);
5) Start the chiller (no negligible);
6) Set the box pressure to +1 ~ + 6 mbar.
2, shutdown
1) Turn off the oxygen analyzer;
2) Turn the circle;
3) Turn off the vacuum pump;
4) Turn off the chiller;
5) Wait for half an hour, then ensure that the compression of the box is 0 MBar;
6) Turn off the working gas pressure reducing valve main valve;
7) Turn off the main power switch
3, items put in the glove box
1) Turn off the transitional row, close after the qi;
2) Guarantee the inner antechamber door is closed;
3) Open the door, put the item into the antechamber, turn off the antechamber;
4) Pumping, qi and other three times (LCD screen, closed bottle, etc., etc., can reduce the extraction time, increase the number of pumping times);
5) Open the door door, take out the item
6) Turn off the inner antechamber, after the negative pressure state, place it for use.
note:
It is forbidden to put water-absorbing items such as rag, paper towels, etc., dry before putting it!
It is forbidden to try to open the inside and outside of the door under negative pressure!
It is forbidden to operate the gloves with a ring with a ring, watch, etc. to destroy the object!
4, items take out the chamber
1) Turn off the transitional row, close after the gas;
2) Open the inner antechamber (note: Before opening the atmosphere, the atmosphere is inert atmosphere before opening, and it is impossible to determine it, you need to pumping, qi three times);
3) put the item into the antechamber, turn off the inner antechamber;
4) Open the antechamber door and take out the item;
5) Turn off the antechamber and draw to a negative pressure state.
5, purging
1) Definition: The gas in the box is discharged from the gas inside the box.
2) Steps:
1 Ensure that the work is sufficient;
2 close the loop;
3 point “purging” button on the touch screen, point “start”
3) Causes of cleaning:
1 first debugging;
2 Long time is not enabled;
3 misuse, make air enter;
4 Clear organic steam such as gloves (organic steam and other content) will affect sensors and purify materials.
6, regeneration
1) Regeneration: mixture of hydrogen and inert gas (hydrogen accounts for 5% -10%)
2) Quantity: 40L gas cylinder 10MPa
3) Regeneration pressure: about 0.05MPa
4) Process: 3 hours heating – 3 hours heating and ventilation – 6 hours vacuum – 8 hours cooling
5) Steps:
1 Connect the regenerative gas pressure reducing valve to the regenerative gas cylinder, open the main valve to the maximum, set the sub-valve to 0.1 MPa (about 0.05-0.08 MPa when the ventilation is required);
2 Close the loop and analyzer;
3 open the vacuum pump;
4 start regeneration;
5 The first three hours warm-up, the fourth hour started ventilation, start the ventilation, adjust the pressure relief valve pressure, so that the flow meter flow of the air outlet is 15-20 L / min (sometimes the gas is turned with pressure with pressure Large, pay attention to the maximum flow rate no more than 20Lmin);
64-6 hours is a ventilation time, and the regenerative gas cylinder can be removed after the end of the end (subsequent time is the automatic operation of the glove box, and the regeneration is not allowed to be closed).
Precautions:
Regeneration process (especially for 6 hours) should not be discontinued! Some pressure reducing valves are not allowed to adjust the pressure appropriately to ensure continuous ventilation for 3 hours!
7, H2O analyzer cleaning (limited to cleanssed probes)
1) Cause: If the water probe is not cleaned for a long time, the surface will attach some dirty things, affecting the detection.
2) Steps:
1 Close cycle and analyzer;
2 Set the working pressure to +5 to + 8 MBAR;
3 Remove the water probe, quickly use the blind plate to blind out the air.
4 Unscrew the metal protective cover at the front of the probe, clean with deionized water, then dry with dust-free paper, apply the cleaning liquid to the probe, pay attention not to let the droplets;
5 put it back, open the analyzer, open the loop, and wait to return to normal level.
Precautions:
When cleaning the water probe, you must gently wipe it! If the water probe cleaning prompt, wait after the cleaning, click “Settings” to click “Cleaning” to eliminate the reminder symbol!
No account yet?
Create an Account